The Fenn Trap may be the best trap in NZ. How to become an expert with it.
By John Dyer
They say “10% of fishermen get 90% of the fish”. This might be exaggerated, but clearly some guys are much more successful than others. Is it blind luck? Nearly always it comes down to the six-P’s; “Prior preparation and planning prevents poor performance”. In trapping vermin too, it takes as long, (or longer), to check a poorly laid out trap-line as it does a well-organized one. So, any time spent in preparation is well invested to increase your efficiency and your catch rate. If you want to be among the winners of a predator trapping competition and/or want to increase the amount of game and native birds around a pond or on the farm, these are all top tips to make you an expert trapper.
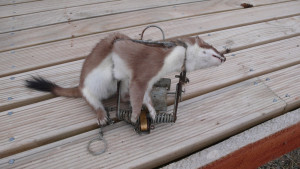
Photo 1. Stoat caught in Mk4 Fenn trap. Note black-tipped tail. (Photo courtesy of Neil Hayes).
WHICH TRAP? The Fenn trap was invented as a more humane replacement for the old “gin” leg-hold trap when it was banned in the UK in 1957. Alan Albert Fenn started his business A. Fenn and Co., in Redditch in Worcestershire, England in 1958. His trap underwent continual development with the Mk. 4 and 6 models being the latest versions. Although Alan Fenn died in 2001, DB Springs of Redditch in Worcestershire still make some 30,000/year to the original Fenn design. Rival UK makers Solway and Springer also market their similar copies and all 3 brands have their trap plates marked accordingly. Beware however of flimsy eastern-made copies being sold as “Fenn traps”. They are not up to spec and are not approved in the UK, for instance.

Photo 2. Weasel in Mk4 Fenn trap. Notice tail is not black tipped. (Photo courtesy of Neil Hayes).
TRAP PREPARATION: Before using Fenn traps, make sure you set the plate height so it’s level with the trap itself. With safety on, a screwdriver shaft under the plate allows it to be bent down if it is too high. Or set-off push/bend it upwards toward the safety, if it is too low. Now set the trap and recheck.
If the traps you’re using are brand new, you’ll need to get rid of the factory smell. Give them a good wash in hot water and detergent, or soak them in baking soda or simmer them, (never boil traps), with washing soda crystals, followed by a thorough rinse in cold water. A cycle in the dishwasher will also degrease new traps of factory oils and protective wax. Professional gamekeepers advise that the traps should then be buried for several days or weeks. The enzymes in the soil will not only condition the steel, (removing the shiny look and giving it a slight rust blemish), but also remove any remaining unnatural smells. Or you can hang it somewhere safe outside to weather for a similar period.
A rusty coil spring loses strength simply because the remaining coil width has shrunk. I’ve tried dipping or spraying the traps with various rust proofing paints. To pre-clean well-used traps for painting or other coatings, American trappers use lye, (a.k.a. sodium hydroxide or “caustic soda”). Be sure to get 100% sodium hydroxide, (NaOH) such as Bunnings sell. This is a product that needs to be used with considerable caution. For instance, always wear long sleeves and pants, rubber gloves, safety eyeglasses, and read all the safety instructions thoroughly. Never add water to lye, rather introduce lye SLOWLY to the water, then add heat. Despite uninformed opinions that boiling water will not affect trap spring tension, only ever simmer traps in cleaning solutions.
Traps simmered in lye should afterwards be well rinsed, dried then bathed in acetone or a similar degreaser to remove any trace of lye remaining. A little acetone goes further when it and the trap are put in a stout hole-free plastic bag and given a good shake together. They’re then ready to paint.
Animal fluids left for any length of time are tough on finishes and even anti-rust paint does not offer full protection. Unfortunately, the heat from galvanising affects the spring strength, so that is completely unsuitable. Green powder-coating has merit but doesn’t flex and small bits flake off the spring. A stainless version has been ruled out by Jeff Horne, manager of DB Springs, the current Fenn trap makers in Redditch, Worcestershire, due to the cost. He thought that spray-on cold zinc as a primer might have merit and I’ve since used this with success. Lee Newman, an authority on traps who trades in the UK as “The Old Trap Collector”, writes:
“I have found that a paint product called Rustoleum, either in spray can form, or even as a dip after diluting normal Rustoleum paint 50:50 with white spirit is as good a coating as any”.
Rustoleum is imported into NZ by wholesalers Haydn Brush Company of Christchurch. Ask them for a retail supplier near you. I obtained some of their Rustoleum “rusty metal primer”, then used Rustoleum “ultra matt camouflage spray” in dark green afterwards. This does a smart job and is now being tested for endurance in the field. It is very popular with American trappers. If you thin some 50:50 with acetone and dip each trap spring in this mixture, it will coat inside the spring as well.
However, to keep all this in perspective, most UK gamekeepers use Fenn traps unpainted. Their boss is paying for any replacements!
COVER THE PLATE? It can be helpful to initially remove any rubbish in the soil around the trap entrance that is likely to get into the traps’ mechanism. A 37cm diameter round metal sieve with fine (6mm) mesh such as Bulldog Tools UK make and sell in NZ will remove small stones, sticks and leaves. You don’t need to cover the trap plate with fine soil to catch mustelids, (the collective term for stoats, weasels and ferrets), this is normally only done to catch rabbits in their burrow entrances, (what the Mk6 is designed for). Covering the plate is otherwise time wasted.
SPRING TENSION: If the traps are well used, it is a good idea to test their remaining spring strength. A 25kg spring-scale will tell you if they’re past it. At least 12kg at peak is what you want. I write the result on their brass catch with a felt pen so I can easily sort out good from the not so good. A trap with a weak spring will let animals escape and, once they’re trap-shy, they’ll rarely fall for that trap again. The only answer is to have a totally different trap and bait on hand and see if you can catch them out that way. Otherwise, they will live among your trap network with impunity.
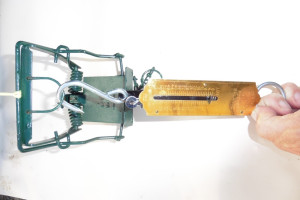
Photo 3. Testing trap spring-weight.
WOODEN TUNNELS OR “CUBBIES”: You can use a black plastic tunnel, but these heat up in the sun and so bait life in them is much reduced. Also, beware, the commercial model was designed for Mk6 Fenns and is unsuitable for Mk4’s. Wooden tunnels last for years if made from H3/H4 treated wood, (not to be confused with creosote and other strongly odorous wood treatments used overseas). Tunnels are 3-sided so that the animal walks in on bare earth below, which does not intimidate it. Tunnels are best made out of 20-25mm timber for stiffness, (so it doesn’t warp and bind on the trap). Length should be 600mm long - ideal for double-setts, (i.e. one trap each end). Research has shown that a trap that catches a rat is at least 2x as likely to catch a stoat, and one that catches a stoat is more likely to catch another stoat. Hence why it’s much more effective to run these traps in pairs inside a single tunnel with any lure used put in the middle. Mustelids prefer a tunnel they can see through.
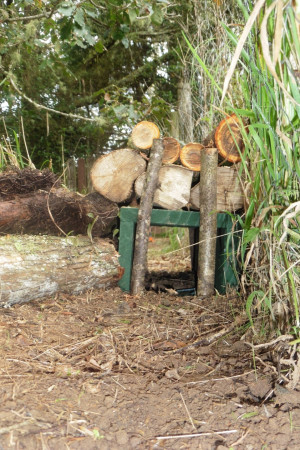
Photo 4. See through tunnels with traps set into shallow earth scrapes are best for mustelids. A log covering makes it more appealing. Logs are also used to funnel vermin to the entrances. This tunnel is set alongside a fence-line, something vermin often follow. The entry has been cleared of grass.
A tunnel/cubby roof that covers the sides helps keep moisture out. If you use decking nails, these are less likely to pull out as the tunnel gets wet and dry repeatedly. This means the width of the tunnel remains constant, making it a lot easier to get the trap safety on and off. The width should be such that the safety can be left off and is just clear of the tunnel sides. The height should be such that the trap can close with just a little, (about a finger-width), to spare. Keep in mind the trap itself is set lower than the tunnel by making a shallow impression in the soil, so the traps sit firmly in it and the plate is level with the ground. Loose soil can be pulled up against the side of the trap and firmed up. If you hear your trap strike the tunnel roof, you’ll need to set it a little lower in the ground.
To the animal looking into the tunnel, it does not see any threatening hurdles that it has to jump, just a plate to stand on. Lee Newman interviewed the late Alan Fenn and his family several times, also visiting the factory to see Fenn traps being made and adds this:
“It appears that so long as the Fenn trap is set so that the plate and jaws of the trap are in line with the ground (i.e. bedded in properly) and the trap has enough room to fire unimpeded, and that the roof of the box/tunnel/cubby is appropriate then the trap will work as expected. The trap actually uses the roof of the cubby to assist its capture; this action was explained to me by the inventor as being imperative in its action and use”.
Mike Swan of the Game Conservancy and Wildlife Trust explains why:
“Many people do not realise that the tunnel is enormously significant to the efficient functioning of the trap. If you set a Fenn trap on the lawn and drop a pebble on the plate, the trap will spring. It will also jump a foot or more off the ground. In doing so there is a risk that any victim would be either thrown clear of the jaws or be held so lightly that it might struggle free. When the trap is set in an overlarge tunnel, the same thing applies. This is disastrous for two reasons; firstly, a predator that should have been caught has got away and secondly, the individual concerned will now be very trap shy, and thus far more difficult to trap in future. A spring trap should, therefore, be set in a tunnel which is only just large enough for it to spring freely. Roof height is obviously the most crucial factor, but too wide a tunnel could allow a rat or stoat to walk past the plate. (He adds), wooden tunnels have the advantage that one can staple the chain, which tethers the trap, to them. This makes life difficult for those who specialise in stealing traps and throwing them away”. (It also stops feral cats and etc, running off with your catch and your trap).
Mk 4 Fenn measurements for 3-sided tunnel should be 5”, (130mm) high INSIDE. A width of 6.5”, (165mm), INSIDE at the base allows the safety to be swung clear of the trap.
Mk6 Fenn measurements for a 3-sided tunnel should be 5, 5/16”, (135mm) high INSIDE and 7.5”, (190mm), wide INSIDE.
The UK Game Conservancy worked with Alan Fenn to develop the Fenn trap and wrote not long afterwards:
“It is essential to build the tunnels fairly low and to stake the entrance with twigs so that the intruders are obliged to pass over the centre of the plate”.
Mike Swan adds:
“It is wise to place the trap well inside the tunnel, and to restrict its entrance with a couple of stout sticks. Dusting gamebirds, which are inevitably attracted by the dry soil at tunnel entrances, are thus prevented from being caught”.
As with the traps, it’s a good idea to get rid of the sawmill smells of a newly assembled tunnel by leaving it to weather outside, even more important if you have painted it. You should apply some form of warning to the tunnel along the lines of “don’t touch”. A stencil with red spray-paint applied direct to the wood is the way to go. If warnings on tunnels are covered up, then place signs nearby and/or at entrance points.
SITING TUNNELS: Draw up a simple plan of the area you want to trap. Where do you suppose vermin are coming from and how can you intercept them? The sides of creeks, streams and drains are vermin highways. Likewise, any log across these. No log? Why not make one from a plank of wood with a Fenn trap in the middle. This is known as a “rail trap”. All Fenn traps need to be covered with a tunnel to prevent unwanted catches such as birds, (in the UK, covering them is required by law). For traps set on logs or planks, many professionals now use a wire mesh tunnel so they can easily see if they’ve made a catch. A couple of blocks of wood (level with the trap but chamfered on their outer edge), either side of the trap help the animal to cross the plate correctly. Other places for traps are alongside hedges or even in the hedge to provide a shortcut from one side to the other. Alongside a fence, fallen log or next to a wood or stone heap are all good, also beside offal pits, out-buildings, any habitat perimeter and even mangrove edges!
Look for where rats and mice congregate at that time of year as the mustelids will be there too. For instance, where macadamia nuts, kahikatea or other tree fruits are lying on the ground attracting rodents. Rodents move into nice warm hay-barns full of new grass seeds as winter approaches, so a covered trap set there alongside an outside wall is good. If there is any sort of small entry hole in the wall, that’s where your trap should be.
If the area floods, a waratah driven into the ground, stapled and wired to the tunnel will save your expensive traps from being washing away.
FUNNELS: It will certainly increase catch rates if you use stones, logs, branches and/or a shallow trench arranged to make a funnel leading into both entrances. This makes it harder for the animal to bypass the trap. Likewise, the entry path should be kept clean of debris, grass, etc. Spraying it with Roundup may help. If the tunnel is in shade, even just from some tall grass, that will prolong lure life, but you can also cover it with logs, turf, stones, etc. The more natural it looks, the better it will work. Use a couple of pointed sticks driven in each end to guide any vermin directly over the trap plate. Sometimes called “fencing”, it also helps to keep out any unwanted by-catch such as birds and dog’s noses! By using a small wooden mallet, the wooden ends of my hazel sticks don’t split as they would be by using a steel hammer. A swan-necked onion hoe, such as Kent and Stowe make, was recommended by several gamekeepers as ideal for making the shallow impressions to receive the 2 traps. Being swan-necked it’s also a handy size and shape for housekeeping the soil inside and around the tunnel. The Fenn trap springs must go parallel to the tunnel wall so the trap closes on the animal properly to cause instant death. Don’t make the mistake of setting it so the springs sit across the middle of the floor. For right-handers, staple the chain to the lower left side as you face the entrance. Some say to cover the chain with light soil and so I now do it out of habit.
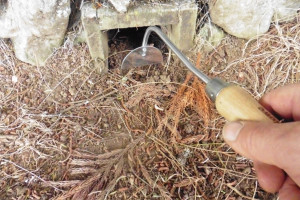
Photo 5. Kent and Stowe swan necked onion hoe purchased on Trade Me.
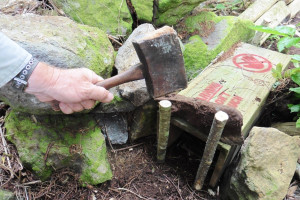
Photo 6. Wooden mallet for entry sticks.
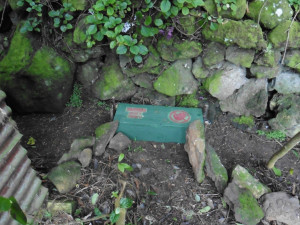
Photo 7. Stones used here, beside an existing stone wall, to funnel animals to entrance.
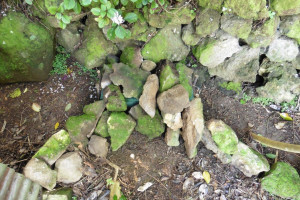
Photo 8. Tunnel now covered to make it more appealing to mustelids and less obvious to thieves.
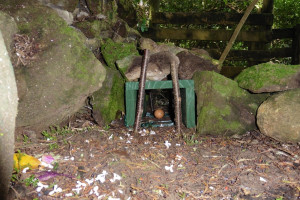
Photo 9. As seen from ground level.
The good oil: NZ based world mustelid authority Dr Carolyn (Kim) King advises:
“The Fenn is well made and reliable, especially if oiled occasionally”.
Some trappers recommend fisholene. It might work on some trap types, but is to be avoided on Fenn’s as it soon becomes sticky and hard and it attracts all manner of dust, etc. On sliding surfaces this only serves to make the whole trap slow. We want clean kills, and this is completely the wrong way to get them.
Other trappers use a few drops of motor oil on sliding surfaces. A small oil “squirt-can” is handy for applying this. However, others such as Mike Swan was aghast at that idea:
“If a lubricant is considered necessary, it should be a natural one such as corn oil or animal fat – not a highly aromatic mineral oil or grease, which is alien to wildlife and which could arouse suspicion”.
Lee Newman tells me he has videoed mustelids that refused to enter when they smelled motor oil, but this was not the case when his traps sliding surfaces were rubbed with unscented candle wax. National Candles here in Wellington, NZ, sell unscented table candles made from food-grade paraffin and a plant-based vegetable oil. These are entirely suitable. So too are their preserving jar wax plugs. Both products are sold by most supermarkets and are 100% paraffin and a handy size to carry. Food grade means it has been refined and there are no distracting smells from contaminants.
Olive or corn oil certainly does not bother Norway rats which are in fact are attracted to it. However, because they lick it they are less likely to cross over the trap plate properly. Mustelids have acute senses and so I use Ballistol Trap-Oil. It is also food grade and, most importantly, it has no taste, no smell and works from -50 to +150 Celsius. I imported this from Waffenpflege-Shop in Meerbusch, Germany through Ebay.de. (It’s labelled as Ballistol-Klever Fallenöl). It optionally comes with a small oiler-pen and filler funnel. This is not to be confused with Ballistol gun oil - a good product, but it is not odourless trap-oil. With a few drops of trap-oil from the cleverly designed Ballistol oiler-pen on sliding surfaces and pivots, you can sense that the lubricated trap is much faster and that means cleaner kills, which should always be our aim.
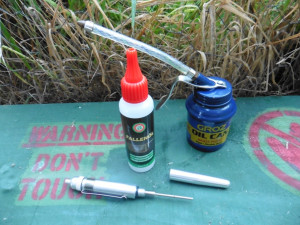
Photo 10. Ballistol-Klever trap-oil, oiling pen and Groz engine oil “squirt-can”.
Setting a trap “tipple”. Author David Bezzant recently wrote in Pest Control for Smallholders:
“In terms of achieving what are referred to as quick or humane kills, extensive studies have confirmed that the Fenn trap has a 90% success rate and the minority of failures were attributed to faulty setting… Attention has to be paid to placing the trap in the correct location, at the right level within the tunnel and on a fine enough setting to ensure success”.
Unfortunately, at least 2 of these points routinely get overlooked in this country. Most of us have heard the phrase, “What’s your tipple?” This is a Northern English dialect word meaning, the drink that makes you tip over. For gamekeepers, “tipple” means setting your Fenn trap so that the plate is just on the edge of tipping. To do that, you will need a safety in place. Almost all the Fenn traps we have seen DoC staff use had their safety completely removed. You’d soon know who was setting their traps tipple, the trappers with bandaged fingers! How many vermin must have escaped a hard-set trap that might otherwise have caught? Veteran Norfolk gamekeeper Bob Smithson wrote:
“To catch weasels successfully the Fenn trap needs to be very lightly set but then, in my view, this is always the case with all vermin species”.
Undoubtedly the reason someone well-meaning in DoC removed ALL these safeties was so that field workers wouldn’t forget to flick the safety off when they reset their traps. A set Fenn trap with safety still in place will snap - but only as far as the still-engaged safety will let it. That fright could easily make a predator trap-shy from then on. If you’re looking after kiwi chicks in the wild, then even a few remaining trap-shy stoats can wreak havoc. But there’s a reason the safety is part of the design, and it needs to stay there. A tipple trap is a lot more likely to catch the physically smaller female stoats and weasels which researchers now think are the key to controlling these species. Just don’t ever forget to flick the safety off before going to the next trap. Say 3x every night before you go to bed; “I must not forget to flick off the safeties tomorrow”.
The latest Fenn traps all have brass triggers which have proven to better than steel. You’ll find it a lot easier to set them tipple if you first give the notch inside the trigger and also the corresponding flat surface of the brass tongue a thorough clean with OOOO-steel wool soaked in light oil. Especially if it was in need of a clean, you’ll now find the trap much less likely to spring-off accidentally as you put it back in the tunnel.
SETTING STICKS: These are a 460mm stick with one end shaved down flat. It sits nicely under the trap plate and stops it going off while you position the Fenn back in its tunnel. Withdraw the stick and also flick the safety off with it. That way your fingers are out of harms’ way. A bit of orange tape makes it easier to find the setting stick if you put it down.
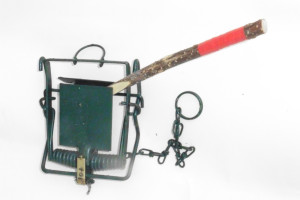
Photo 11. Setting stick.
USING DRAGS: This refers to dragging a dead prey animal such as a rabbit through the grass toward the trap. Just tie it to a bit of string and you might want to slit open the gut cavity to make it smell “more attractive”. You can make multiple drags TOWARD a tunnel entrance or drag it between tunnels. What this does is gets the scent message much further out there than a lure in the tunnel can do all by itself. Any vermin cutting this trail will follow it to your trap. Drags aren’t essential, but they will certainly help. Even just disturbing the earth around a trap with your boot or using the onion hoe will make it look and smell more interesting. However firm the earth down afterwards. To a mustelid, it looks like a rabbit has been digging and so it’s definitely worth investigating. Keep the tunnel entrance clear or twigs, leaves and other rubbish; “a clean entry means a clean catch”.
MUSTELID LURES: Dark tunnels will attract mustelids even without a lure. They’ll check it out to see if mice or rats are living there and the smell of what it caught recently will also act as a lure. In contrast, sometimes a new trap will not catch for ages. Don’t give up on it just yet. Often the smell from its’ first catch is all that it needs to start catching afterwards. However, some traps will inevitably prove better sited than others and so you might like to move them to see if they work better elsewhere. Vermin don’t like being caught in the open, for instance, so try a tunnel set on the far side of an opening, like a gateway, so they run into it for safety. You’ll need to set traps so that cattle (or the public!), don’t interfere with them. Number your traps and keep baiting and catch details recorded in a notebook. You’ll soon see what is working best.
Never place a lure on a Fenn trap plate, but rather past it, making the animal walk over the trap. Or put it under the trap plate if you have just a single trap. There are quite a few lures you can use to improve the catch rate. One of the best is flesh from rabbits or hares or the liver from either. These only last a few days, especially in summer. One way around this is to use freeze-dried rabbit marketed by Connovations of Auckland as “Erayze”. This is sold in a convenient “chocolate bar” that allows you to break off one segment per tunnel. However, it will go mouldy if it gets damp. If using a DoC trap, these are open to the weather and rain can easily enter. I use the plastic box from a packet of .22 rimfire and drill a couple of holes in one end. This I cable-tie to the wire mesh so that it is tucked up under the lid out of the rain. Don’t use these plastic boxes loose in a Fenn tunnel as it may interfere with the trap closing as the critter is walking off with it. Ask me how I know this.
Pest Control Research in Christchurch sell a mustelid/feral cat lure which is polymer-protected making it somewhat water resistant. Why not alternate with Erayze?
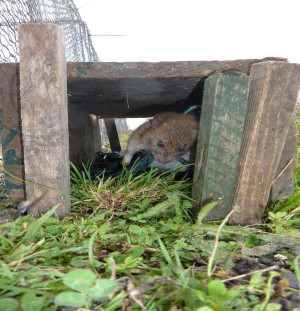
Photo 12. Use ‘fencing’ sticks at each entrance to guide animals directly over the trap plate.
Hen eggs, (size 6 or smaller, including bantam eggs), are popular baits which can last 1 month or more. I like to alternate eggs every now and then with my regular meat-based baits so that something new is offered to entice that hard-to-catch predator that has seen it all before! Any fat attached to a meat bait will help it last longer.
Do not discard old or mouldy lures when refreshing them. A hungry predator might eat an old lure and be put off that type altogether. Rotten lures and/or well-dead critters left near your trap are known to deter mustelids. Likewise, traps should periodically be cleaned of fur and bits of dead animal with a wire brush – or even a water blaster if necessary. Traps that haven’t caught should be sprung every 1-4 weeks, depending on how much accumulated rubbish, (leaves, silt, etc.), they have under the plate that might prevent them catching. Check especially after heavy rain.
OTHER SCENTS: If you catch a bitch, (female), weasel or stoat, and squeeze its’ bladder onto the trap plate, this can catch numerous lovesick dog-stoats/weasels, (the males). But I suspect that not many rats will want to enter a tunnel smelling of their mortal enemy. Should you catch a bitch stoat around November, and notice that her teats are prominent, leave her body in some bushes close nearby, (but not immediately above), the trap and you may catch her litter over the next few days, (they can have up to 12 kits). These young animals learn how to hunt from their mother by accompanying her from 1 to 3 months of age. After that they can kill on their own. This is your window to catch the whole pack.
RATS: Rats have been videoed catching and killing tree-nesting birds just like a stoat. In fact, they can run from branch to branch almost as quickly as on the ground. Fenn traps will certainly catch rats, but if you also poison rats, keep in mind that some poisons like Brodifacoum can travel up the food chain to moreporks and other birds and even to humans! It pays to use any rat bait in a padlocked box to keep small children out. Secure the bait to prevent rats taking whole blocks of it away. A good bait, in my opinion, is D-Block Extreme, containing Diphacinone. This is highly toxic to rats and 70% of stoats that ate these poisoned rats in trials died also. However, it has a very low toxicity to birds like mallard ducks, should the rat drop some while it is running off. If you’re using poison, don’t forget to buy some warning labels for the bait-box and also for entry points. Rats will also be attracted by lures such as Erayze in Fenn trap tunnels. Moreporks and native wood pigeon are very vulnerable to tree-borne predators like rats and stoats when nesting, so it’s not just gamebirds you’re helping.
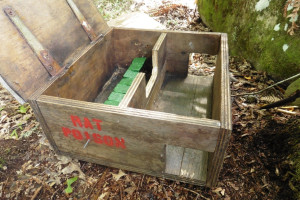
Photo 13. Rat poison box fitted with hasp and staple with a small rust-proof padlock. Note the possum proof centre baffle.
CATS: If you have feral-cat problems, then a good lure has proven to be fish heads inside Timms traps. Chopped up raw eel also has been used with success, (pukeko make excellent bait in an eel net). Make sure the Timms trap is pinned down with wire. This should have been sold to you with the trap, but often the shop employees don’t know this, so just ask. If you have a cage trap, then beware that cats hate walking on wire. Cover it with something such as leaves or pine needles or even make a plywood floor for it. Trappers in the field have found that sardines in either spring water or aspic make good cat bait behind the cage treadle. Beware that cats will often try to pull the bait through the wire rather than go inside the trap. So back it up to a tree and use screens such as rocks or logs to prevent this. Cats will kill sitting ducks, but even if they fail to catch her, the hen-mallard will often abandon her now too-risky nest.
HEDGEHOGS: When hedgehogs are removed, species like quail soon return. It’s likely they also take eggs from mallard nests. They certainly take larger birds eggs than this overseas and are closely linked with the sharp decline of some seabird species because of it. They hit the shell with their front teeth until they make an opening and then lick out the contents, breaking more shell as they go in. Hedgehogs are now more common in NZ than in their native UK, and a mallard nest is seldom far from one of these prickly customers. Hedgehogs are often attracted to older baits that have become flyblown. If you catch a large hedgehog, then one trick is to hang them nearby but not directly over the trap to attract more. Incidentally hedgehogs and perhaps other vermin eat frogs whose tadpoles might otherwise have fed native bitterns and herons. Your trapping efforts can benefit a whole variety of species.
WHEN TO TRAP: The best time to trap is from spring to late summer when hen-mallards are sitting on their eggs and while her ducklings are still unable to fly. If you want to trap vermin at other times of the year too, heck, why not?! Permanent traps actually catch more. If you can’t regularly check your traps, it’s best to spring them onto the safety so vermin can walk over them unharmed. When you’re back on duty, they won’t notice it’s now reset ready to go. If you’re leaving Fenn traps hanging in the shed, unhook them so their spring tension is relaxed.
GLOVES: Older gamekeeping references state when setting Fenn traps that, “Gloves need never be worn”. However newer ones say they do. Which is correct? Lyn Nicholls from Connovation Ltd points out that the human hand has a very fine layer of natural oil that rubs off on what we touch. “Want proof?” she says. “Try catching soap bubbles in your hand. They all pop. Now do it wearing cotton gloves”. Traps that have been touched by human hands often do not catch for several days while that scent wears off, yet this is when the lure is freshest. We can improve those odds by avoiding any unnatural scent, such as soap, Diesel oil or even just from patting the dog. Hands or gloves need a good wash first, ideally in drain/creek/pond water, and then get them dirty by rubbing plenty of soil or leaves into them. Another good reason to wear gloves is to avoid handling dead rats or hedgehogs that may be infected with Leptospirosis, bovine-tuberculosis or even Toxoplasmosis. Actually, that’s a good reason to catch them too, to stop vermin spreading these diseases. Cheap leather fitters’ gloves can also be useful for getting dead hedgehogs out of traps.
GAME CAMERAS: If you haven’t caught anything in a while, you’re winning right? A game camera can be a big revelation and show you just what and how much is lurking about when you’re tucked up in bed. For instance, I’ve often heard people complain about the large quantities of rat poison that they were losing. One even suspected theft by humans! But in my case, the game camera showed that possums had managed to reach around and pull the poison blocks out of the locked poison box. The answer was to either replace the rat poison with something lethal to possums or to redesign the baffles inside the box. I did the latter. Game cameras have also shown possums and feral cats crawling all over a DoC 250 but not being able to get in. The entry holes were simply too small for them. These double baffles are designed to keep kiwi beaks out when used in the bush but they can be slightly widened when no kiwis are present. Hedgehogs somehow manage to squeeze down and get through even small entrances, but when they’re dead they’re much harder to get out!
A game camera also revealed a cat checking out my Mk 6 tunnel, but then walking off. What went wrong? Could it be that some of the casually discarded “Erayze” baits were old and mouldy, and the cat had learnt to avoid them? A change to something like sardines in aspic or eggs might re-boot the traps’ attractiveness. This trap had also gone off several times but was usually empty. A review of these failures showed the tunnel roof was too high and the sides need to be lowered. That cat might have already had a few close calls.
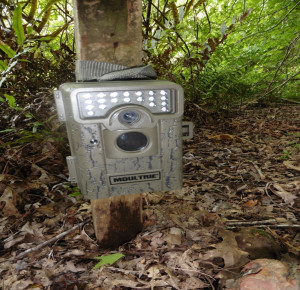
Photo 14. Came cameras can be very revealing and help hone your technique.
DOC TRAPS: The weight range of mature female weasels is 45-60g and males 60-130g. Stoat males by comparison range from 125-300g but the much smaller female stoats weigh only about the same as a male weasel.
Female stoats have delayed implantation which allows the male stoat to come back just a few days after birth and fertilize both the mother and his own un-weaned offspring. This ensures that in the following spring all the female kits will have litters. Because of their unusual (some would say unsavoury), reproductive strategy, researchers believe that the lighter females are the key to controlling stoat populations.
DoC traps have been tested after arrival from the factory set as high as 135g. Researchers believe that only by catching the much lighter females of these 2 species can their population be controlled. That’s a big ask if a lighter female stoat or weasel can do an Irish tap dance on a trap plate and still not set it off! Try that with any “tipple” Fenn trap.
THE FUTURE FOR FENN TRAPS: As mentioned previously, if you want to catch a trap-shy animal, you’ll need a completely different trap and bait. So, any suggestion of phasing out the internationally renowned and time-proven Fenn trap in NZ seems to be PC nonsense. Dr Carolyn (Kim) King once described the Fenn as:
“A ‘humane’ trap designed to be set in tunnels and to kill instantly by closing across the animal’s backbone, immediately breaking the spinal cord. It is well designed, strongly made and efficient, and is to be strongly recommended to all concerned with the prevention of cruelty as well as wildlife conservation… It is adaptive enough to be effective in any habitat and on any scale”.
There have been calls to replace these well-proven Fenn traps with DoC-series traps in NZ, which on paper seem to offer a more humane option. This doubtless will appeal to some who have never set a trap in their lives. However, it is a strategy that could, IMHO, put our rarest species at much greater risk of predation and ultimately extinction, unless this newer trap can first be made fit for purpose. It seems very odd that the budget in this country for aerial application of 1080 poison to kill mustelids, rats and possums has just been increased by NZ$21 million. Yet this toxin takes from 6 to 18 hours to kill. Highly distressing videos of 1080-poisoned dogs and horses show just how excruciating the animal’s final death throws are. However, an instant-kill trap is being phased out by the same authorities because it occasionally takes up to a minute to cause clinical brain-death. From what you have now read, that could be entirely due to set-up, (no safeties, hard-set triggers and wrong sized tunnels).
Using these tips, you should now get the best from any Fenn trap and even from some of its’ main alternatives which can and should be used in tandem to mop up any trap-shy vermin.
Good luck!
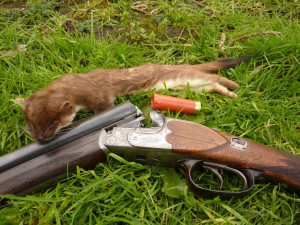
Photo 15. The only good stoat.