Back to Fishing Knowledge Hub
Spin fishing
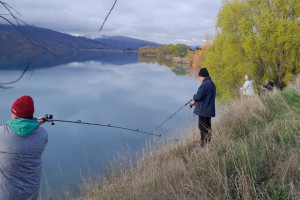
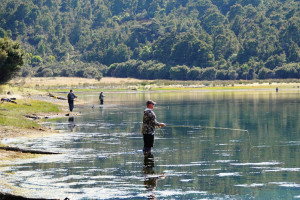
Spin fishing is one of the most popular and accessible ways to catch trout in New Zealand.
Spin fishing is a great starting point for beginner anglers because it is easy to learn, enjoyable, and highly effective.
Unlike bait fishing, spin fishing is an active style of fishing that involves regularly casting and retrieving lures. This provides plenty of opportunities to practise and improve your casting skills while covering water and searching for fish. As a result, spin fishing is an excellent way for new anglers to build confidence and become proficient with a rod and reel.
Guides


What is spin fishing?
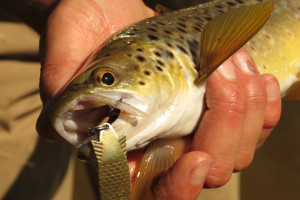
Spin fishing involves the use of artificial bait (lures) made from materials such as metal, rubber, or plastic. These lures are designed to imitate small fish and other natural prey that trout feed on.
Unlike some other methods of fishing (bait fishing), spin fishing is an active technique. You cast your lure into the water and then retrieve it by winding it back in. As you wind in your line, the lure moves through the water with an ‘action’ that is intended to imitate a wounded or distressed baitfish moving through the water. This action could be a wobble, wiggle, erratic darting or a flicker. Hungry trout may see or sense this movement, mistake it for an easy meal and strike (bite it). This can give you the opportunity to hook and hopefully land that fish. If you find fish are following the lure but not striking, vary the speed of your retrieve.
Must read Before you fish
The spinning rod and reel
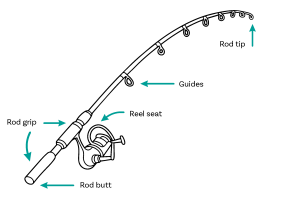
Each component of a spinning rod and reel has an important job and knowing what it does will make setting up, casting and landing fish much easier.
The reel
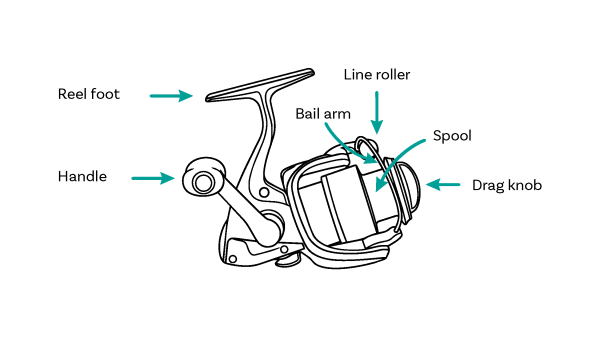
- Spool - the spool holds your fishing line. When you cast, the line peels off the spool, and when you wind the handle it is retrieved back onto the spool.
- Handle - the handle is turned to retrieve your line and lure. It also gives you control when playing and landing a fish.
- Bail arm - the bail is the metal arm that opens to allow the line to leave the spool during a cast. After casting, simply close the bail to begin retrieving your line.
- Reel foot - the reel foot is the part of the reel that fits into the reel seat on the rod, securely attaching the reel to the rod.
- Drag knob - the drag knob adjusts how much pressure is needed before line is pulled from the reel. A correctly set drag helps set the hook following a bite and prevents line breakages when fighting fish.
- Line roller - the line roller guides the line evenly back onto the spool as you wind the handle, helping to reduce line twist and wear.
Check out the diagram below for further instruction.
The rod
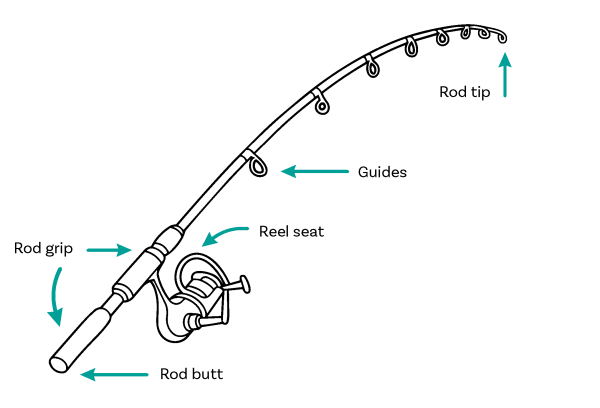
- Rod Tip - the rod tip is the last 10–15 cm of the rod and is the most flexible part. It helps you detect bites and cushion movement from hooked fish.
- Caution - The rod tip is the easiest part of the rod to break, so always be aware of where it is, especially when walking through vegetation or transporting your rod.
- Guides - the guides are the rings that run along the rod. They keep the fishing line close to the rod, allowing it to cast smoothly and helping distribute the load when fighting a fish.
- Reel Seat - the reel seat holds the reel firmly in place. Tightening the locking ring secures the reel to the rod.
- Handle - the handle is usually made from cork or foam, providing a comfortable and secure grip.
Check out the diagram below for further instruction.
Must read Before you fish
How to set up a spinning rod
Most spinning rods come in two or four pieces, so start by assembling the rod sections and ensuring all guides (eyes) are aligned in a straight line.
Attach the reel to the reel seat and tighten it securely. Run the fishing line from the reel underneath the bail arm and through each guide on the rod, starting at the guide closest to the reel and working towards the rod tip. Finish by attaching your chosen lure or hook. Before casting, check that everything is secure and that the line runs freely through the guides.
How to put line on your reel
Begin by attaching your reel to the rod and running the line through the all the rod guides starting at the guide at the tip of the rod.
Open the bail arm on your spinning reel and tie the line to the spool using a simple arbor knot. Close the bail arm. Before winding, place the line spool flat on the ground so the line comes off the spool in an anticlockwise direction. This helps minimise line twist. Apply light tension to the line as you wind it onto the reel by gently holding the line between your fingers. The line should be loaded evenly and filled to just below the lip of the spool to maximise casting distance and reduce tangles. Avoid overfilling the reel, as this can cause line to spring off the spool during casting.
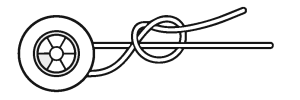
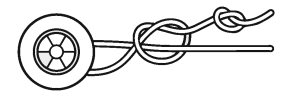
Arbor knot
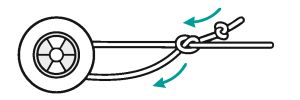
The standard knot for attaching fishing line to the spool of a reel when loading on new line. It's quick, secure and easy to tie. You won’t need to tie this knot too often.
|
|
| 1. Thread wrap - Wrap the line tightly around the reel’s central spool shaft. | 2. Stopper knot - Tie a second overhand knot with the tag end. |
|

|
| 3. Tighten - Moistend the knots and pull snug. | 4. Slide & Tighten - Sliding both knots down to the spool. |

|
|
| 5. Trim - Cut off the excess tag end, leaving a few cm. |
Lure types
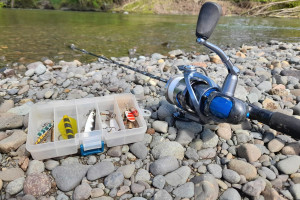
There are many different lure types available in tackle shops, and most will catch fish. However, for beginner anglers it can sometimes feel a bit daunting walking into a sports store, seeing all the options, and trying to decide what to buy. Below are some reliable lure options that work well across many rivers and lakes in New Zealand.
Toby Lure
The Toby is one of the most popular trout lures in New Zealand. It comes in a wide range of colours, with some of the most effective being black and gold, green and gold, and plain silver. For most situations, 7g and 10g sizes are ideal. The Toby is a proven all-round lure that performs well in a variety of conditions.
Bladed Spinners
There are many bladed spinner options available, but some of the most reliable include Veltic and Mepps spinners. They come in a range of sizes and colours. Size #2 is well suited to small streams, while size #3 is a good option for larger rivers. These spinners are particularly effective in faster water when casted upstream and retrieved just faster than the current, ensuring the blade continues to spin consistently.
Wedges and Slices
Wedges and slices are simple lures that catch plenty of trout. They are a budget-friendly option for anglers getting started and are easy to use. The 10g size is recommended as it casts well and provides a good all-round weight for a range of fishing situations. Silver-coloured wedges can be particularly effective in the tidal reaches of rivers.
Tasmanian Devil
The Tasmanian Devil (commonly known as a Tassie Devil) in the 14g size is a popular lure for trout fishing in large rivers and lakes. Its design creates an erratic wobble during retrieval, which can often trigger a take. Tasmanian Devils are available in a wide range of colours and patterns, and it pays to carry a few different options in your tackle box.
How to cast a spinning rod
Hold the rod comfortably with your dominant hand and open the bail arm on the reel.
Use your index finger to hold the line against the rod. Point the rod tip towards your target, then smoothly bring the rod backwards before swinging it forward in a controlled motion. As the rod moves forward, release the line with your finger to allow the lure to travel towards the target. Once the lure lands, close the bail arm and begin retrieving. With a little practice, your casting accuracy and distance will quickly improve.
Three useful knots to know
It’s a common misconception that you need to know lots of different knots to go fishing. The truth is, a few reliable, well-tied knots will cover you in most situations.
The improved clinch knot
The clinch knot is one of the most commonly used fishing knots for attaching hooks, lures, and swivels.
To begin, thread the line through the eye of the hook or lure, then wrap the tag end around the standing line six times. Pass the tag end back through the small loop near the eye, then through the larger loop that has formed. Moisten the knot (this is commonly done using a small amount of saliva) before slowly tightening it by pulling on the main line and line end. Trim any excess line once the knot is secure.
The improved clinch knot is simple, strong, and reliable for most freshwater fishing situations and once you have practiced it a few times, it becomes very easy to tie.
Check out the diagram below for further instruction.

|

|
| 1. Thread & wrap - Wrap the line tightly around the reel’s central spool shaft. | 2. Loop & tighten - Pass the tag end through the first loop, then through the larger loop created. Pull snug. |

|
|
| 3. Cinch & trim - Moisten the knot, pull tight, and tim the excess tag end. |
Double uni knot
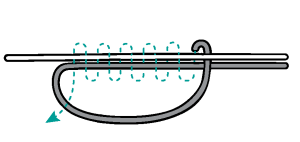
Probably the easiest and most reliable knot for joining monofilament or fluorocarbon leaders to braided line. If you are planning on giving soft-bait fishing a go, this is a useful knot to get familiar with.
Check out the diagram below for further instruction.
|
|
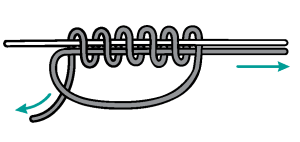
| 1. First loop - Place the two lines side by side and create a loop with the bottom line. Leave a few cm of tag end extending from the loop.. | 2. Wrap - Pass the tag end through the loop and wrap it around both lines at least six times. |
|
|
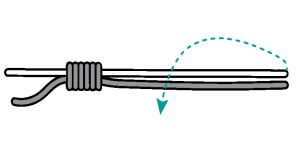
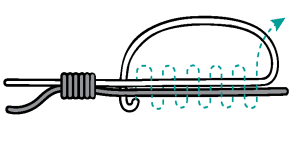
| 3. Tighten - Pull the tag end to tighten the wraps and form the first knot. Check that the wraps are neat and secure, as shown in the diagram on the above. | 4. Second loop - Using the top line, create a loop around the bottom line, Leave a few cm of tag end extending from the loop. |
|
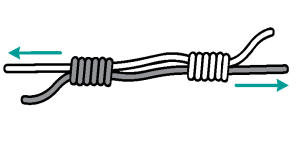
|
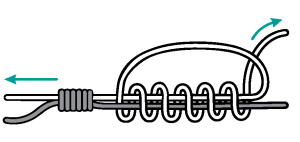
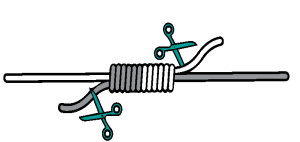
| 5. Wrap & tighten - Pass the tag end through the loop and wrap it around both lines at least six times. Pull the tag end to tighten and form the second knot. | 6. Cinch the knots - Lightly wet both knots and the line between them. Hold the main lines and pull in opposite directions so the two knots slide together and tighten. |
|
|
| 7. Trim the tags - Once the knots are firmly
cinched together, trim the excess tag ends close to the finished knot. |
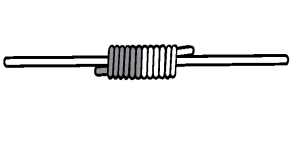
8. Knot complete - Your Double Uni Knot is complete. The finished knot
should look like the diagram above. |
Arbor knot
The standard knot for attaching fishing line to the spool of a reel when loading on new line. It's quick, secure and easy to tie. You won’t need to tie this knot too often.
Check out the diagram below for further instruction.
|
|
|
| 1. Thread & wrap - Wrap the line tightly around the reel’s central spool shaft. | 2. Stopper knot - Tie a second overhand knot with the tag end. |
|
|
|
| 3. Tighten - Moistend the knots and pull snug. | 4. Slide & Tighten - Sliding both knots down to the spool. |
|
|
|
| 5. Trim - Cut off the excess tag end, leaving a few cm. |
Knots for fly anglers
Fly anglers need to learn a couple of specific fly fishing knots.
Must read Before you fish
Spin fishing tips
When out spin fishing, there are a few simple things you can do to improve your chances of catching trout.
Small changes to where, when, and how you fish can often make a big difference to your success. Check out the video below for a rundown of practical spin fishing tips that will help you catch more trout.